Thursday, June 27, 2013

Cup(cheese)cakes!

Yeah, you read that correctly.  Though it may have seemed impossible, I have improved upon both the cupcake and the cheesecake by combining them into the cup cheesecake.

I'd seen the idea somewhere on the internet, but most googled recipes for a cup cheesecake use some form of vanilla wafer cookie for the crust and then a cheesecake batter top.

Boring.

Why use a vanilla wafer cookie as a "crust" when you can make a genuine graham cracker crust?
I actually didn't have that thought process.  My actual thought process when making the cup cheesecakes was more along the lines of...

"Whoops.  I made two batches of cheesecake batter and I only have one springform pan!"

Because the cheesecake has to cool overnight in the pan, baking one after the other isn't really an option.
Instead I remembered the idea of the cup cheesecake.  So I grabbed a couple muffin pans (1 cheesecake recipe = 24 cup cheesecakes), inserted liners, inserted graham cracker crust into each one, poured out the cheesecake filling, and baked... for some amount less time than a normal cheesecake bakes for (I didn't really keep track of time).

When they were done, I had single serving mini-cheesecakes!  The size was perfect for casual sharing, something that has always been hard to do with normal cheesecakes (because slicing a normal size cheesecake is a bit frustrating sometimes...)
The only downside was that the second batch of crust had, for whatever reason, ended up way butterier than the first batch, and a lot of that butter leaked through the cupcake wrappers, hence the post it note in the first set of pictures (to keep grease off my desk).

This isn't really a huge problem, though.  Not compared to the amazingness of the cup cheesecake.


Admittedly, this isn't much of a food adventure for me.  Cheesecake has been a lifelong love, and I've only really eaten my dad's cheesecake... which means that when I left for college and realized I wanted cheesecake, I only had to call him and get the recipe.  I've only had one cheesecake fail and I blame the oven for that one (it was still undercooked after having been in the oven for about twice as long as it usually needs).

Cup cheesecake, however, is still a fantastic experiment that I'm really happy with.  I'll definitely be making these again sometime.

Cheesecake (Recipe originally from a Good Housekeeping cookbook, I think)
Crust:


1 package graham crackers
¼ cup coarsely chopped walnuts
2 tablespoons brown sugar
1 teaspoon ground cinnamon
½ cup (1 stick) unsalted butter plus a little more

Filling:

1 16oz container of sour cream
3 packages (8 ounces each) cream cheese, room temp
3 eggs, lightly beaten
1 cup granulated sugar
½ teaspoon salt
2 teaspoons vanilla extract
Finely grated zest of 1 orange


  1. Smash graham crackers (seriously the best part of the process)
  2. Preheat oven to 350°F
  3. Melt butter
  4. Combine crumbs, walnuts, brown sugar, and cinnamon.  Add the butter and toss to mix.
  5. Save 3 tablespoons of the mixture for the top of the cheesecake and press the rest evenly and firmly into the bottom and slightly up the sides of a 9-inch springform pan.  (OR: Evenly distribute into 24 cupcake cups, pressed into the bottom of each cup)
  6. Bake crust for 10 min at 350°F with a baking sheet underneath to catch dripping butter (baking sheet not necessary for cup cheesecakes).
  7. Cut cream cheese into pieces and add to blender a few pieces at a time with the sour cream.  Add sugar and salt, blend until very smooth.  Add eggs and blend just a short time to avoid air bubbles.  Then fold in the vanilla and fold in the zest.
  8. Slowly pour batter in pan over crust and bake for about 45 minutes (15 minutes for cup cheesecakes).  If the top is not starting to turn brown and it still looks wiggly (when the center is still loose and moist and only the very edges are rising but it looks as if it is about to start hardening), or the bubbles are turning brown, remove from oven and add the topping.  Then bake another 10 minutes. 
  9. Let cool completely.  Refrigerate until ready to serve. (My dad prefers to take the cheesecake out of the fridge an hour or so before serving, I like my cheesecake cold.)
  10. When cutting, use a long slender knife and wiggle it back and forth (don’t saw).  Rinse or wipe the knife off between cuts.  Best when shared with friends!

Wednesday, June 19, 2013

Banana Pancakes. Or Omelet. One of those.

On Thanksgiving, my cousin and I had banana pancakes for breakfast.  We spent the morning singing that Jack Johnson song.

For whatever reason, when I think about these banana pancakes, the song that comes to mind is this thing.  Just replace strawberry with banana.  And more in Jack Johnson style.  I doubt any of you can picture that, but anyways.

According to somebody on Reddit, you can make pancakes from 2 eggs and a mashed banana.  A few other people chimed in with other things that are good to add.  So I set out to make myself an easy, delicious lunch.

2 eggs, one ripe banana, some brown sugar and some cinnamon.  Just mash it all together and go, right?
 Yes!  It actually is that easy!
 I had meant to make 2 pancakes, but something about egg... it spreads.  So I poured it all into the pan like an omelet (is it really spelled like that?)

Banana omelet.  Have I mentioned that I'm not a huge fan of eggs?  My opinion of them is... a little scrambled.

I'll show myself out.
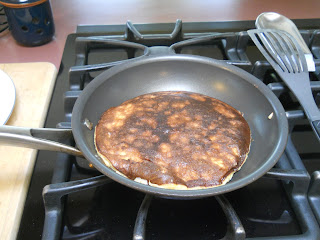
Though, one thing I know I don't like is undercooked omelet.  So I flipped it, somehow.  It got a little overcooked.
And then when I flipped it back...

I'm not sure what to think of this, honestly.  It doesn't look to appetizing does it?

Well, it was delicious.  Almost.  A little too eggy for my tastes, but definitely has potential.  The egg and banana do go together surprisingly well.  Plus, it's definitely good enough to eat plain (which, IMO, pancakes rarely are).  I think next time I'll use 1 egg and 1 banana, or add some other fruit to it.

So I say, try it.  You won't be (too) disappointed!

Tuesday, June 11, 2013

I made birthday cake Oreos?

Apparently I haven't posted anything in a month.  Something about graduating and then driving home made me busy.  (That's no excuse, I got home two weeks ago today).  Anyways, I have cookies to tell you about.

I've been finding that I don't have as much of a sweet tooth lately as I used to.  A few people who have known me for a long time might ask... have you ever had a sweet tooth?  But that's beside the point.

Sweet tooth or no, I can still usually find room for Oreos.  (Really, Firefox spell check?  You don't know about Oreos?)  A little over a year ago, when I tried Birthday Cake Oreos for the first time, I was hooked.  And then couldn't find them anywhere, because apparently they were made exclusively for their 100th birthday, and then went out of production.  So back to normal Oreos it was.

A few months ago, I found myself in a room with some Birthday Cake Oreos again.  I ate my share and went looking to buy some, but, again, no luck.  This time, however, I decided to take action.  I already have a homemade Oreo recipe (as yet untested), but I checked to see if there was a birthday cake Oreo recipe somewhere on the internets.  I was lucky, and stumbled across Kojo Designs, and the story of finding the cookies in the Middle East and needing them again... and a recipe.  Time to start baking.

Pretty standard recipe procedures - first mix together all the dry ingredients (for the cookies).

I'm at home now, which means I get to use this awesome flat wisk thing - just about my favorite tool for mixing together dry ingredients.
Then mix together the sugar and the wet ingredients.  Kirsten, in writing her original recipe, mentioned that the cookies weren't as crisp as Oreos, and that Dutch process cocoa might make the difference.  However, I found that a mixture of half normal / half Dutch Process was about twice as expensive as normal cocoa, so instead I swapped out half the brown sugar for white sugar.

Fun fact: brown and white sugar are interchangeable in cookie recipes, and more brown sugar makes for a moister, softer cookie.
Once your wet and dry ingredients are mixed, mix them together until you have a nice ball of dough, then roll it out.  To prevent staining everything with chocolate, you can roll between parchment or wax paper (or what I did, a sheet of each...).  Seriously, the stuff stains badly, so be careful.

The rolled dough should then be refrigerated for a while.  I went out and gardened, which didn't help the brown-stained hands situation very much.
The recipe calls for the cookies to be cut into 1.5 inch circles.  I realized at this point that my family doesn't own any circular cookie cutters, nevermind one that's only 1.5 inches (slight lie - I do have a circular biscuit cutter, but it's huge).

Time to innovate.  I ran around the kitchen with a ruler measuring things.  Found a 1/2 Liter Nalgene with around a 2 inch circular lid, which could have sufficed (huge cookies, though).  Then I checked the spice cupboard, and ended up using this spice bottle lid.  Exactly 1.5 inches in diameter.
When my mom later asked what I used to cut the cookies, my dad and I just started laughing for a while, which, of course, led to some concern on her part.

Cut the dough into circles, reroll, cut more circles, hope that when you're done cutting you have an even number of circles.  Though leaving one cookie for eating after they've baked wouldn't hurt too much - I was so tempted, but couldn't let myself.
The cookies don't bake for very long, and I pulled them out of the oven and put them right back on top of the stove while I pulled out the cooling rack.  At this point, my mom walks in, looks at the cookies that are very close together on the baking sheet, and says "does the recipe say anything about how far apart they should be when they're baking?  Because these might spread quite a bit, and you wouldn't want them to stick together."

Don't worry, Mom.  I don't think that'll be a problem :)
I guess I forgot to take pictures of the frosting.  That got mixed up and piped onto cookies to make sandwiches, which was a painfully long process, mostly because I was far too stingy with my frosting to begin with, and had to go back and reopen and refrost some of the sandwiches.

Also, you can't really tell here, but the frosting was between pink and purple in color - I added extra sprinkles to enhance the funfetti effect, but they lost their color in mixing and simply colored the frosting a bit.  Would still do again.
Seriously.  Just look at these things.
Don't they look just... amazing?
When I first tried these cookies, I was a little disappointed.  The frosting was good, but the cookie was very crisp and too... chocolatey.  My parents loved them, but I wasn't sure I'd want to try them again.

The next day, however, I took a bunch of the cookies to my boyfriend's graduation party.  During the night, the frosting had hardened and the cookies had become just a little softer and they were perfect.  Perfect.  Everyone at the party loved them and I loved them, and when there was one left on the plate, I was tempted to take it but said to myself "No... I left a few at home... I can have one of those."

Naturally, when I got home, they were all gone.  I watched my mom eat the last one as I wished I'd had just one more at the party.  Or gotten to the last one first.

I've found myself craving them many times since I made them just a couple weeks ago, so I guess, even though they were quite a hassle, I need to make them again.

For any of you who want to try, here's the recipe, mostly copied from Kojo Designs but with my few tweaks.

Chocolate Wafer Cookies
1 1/4 cups all purpose flour
3/4 cups unsweetened cocoa powder
1/2 tsp baking soda
5 TBS salted butter, melted
1/3 cup brown sugar
1/3 cup white sugar
1 large egg

  1. Whisk together flour, cocoa powder and baking soda in a large bowl.
  2. Stir together butter, brown sugar, and egg.
  3. Add butter mixture to flour mixture and stir until you can form the dough into a ball.
  4. Roll dough between two sheets of wax or parchment paper until 1/8 inch thick.
  5. Transfer to refrigerator for at least 30 minutes or until firm.
  6. Preheat oven to 350 with racks in upper third.
  7. Cut out 1.5 inch circle shapes (preferably an even number).  Reroll scraps, re-refrigerate if necessary.
  8. Place cookies on a baking sheet lined with parchment paper (not wax paper!), and refrigerate or freeze until very firm.
  9. Bake for around 8 minutes or until firm.  Let cool completely.

Birthday Cake Cookie Filling

1/2 stick unsalted butter
1 1/2 cups confectioners sugar
1/4 cup funfetti cake mix
2 TBS extra sprinkles
2 tsp pure vanilla extract
1 to 2 TBS heavy cream, as needed (I used half and half, but heavy cream will probably be better)

  1. Beat butter until light and fluffy.
  2. Gradually add the sugar, cake mix, sprinkles and vanilla, while mixing.
  3. Beat in cream in small portions until the icing is spreadable.
  4. Scoop into a piping bag (or ziploc bag with a corner cut off).
  5. Pipe icing onto cookies, adding another cookie on top of each pile of icing until all of your cookies are in sandwiches.
According to the original recipe, these cookies can be stored in an airtight container at room temperature for a week.  I wouldn't know.  They lasted less than 24 hours for me.